-
- Break the seal
- We can detect the position of the seal either by detecting the clamp from above, or relying on its color that, if it is the same as the one in the videos on the challenge’s official website, will be yellow.
- Arm1 (assume it is the closer to the clamp, otherwise Arm1 and Arm2 switch) grasps the bottom part of the seal.
- The same Arm1 lifts the seal upward to give the cutting tool on the other arm sufficient space to cut the seal from above.
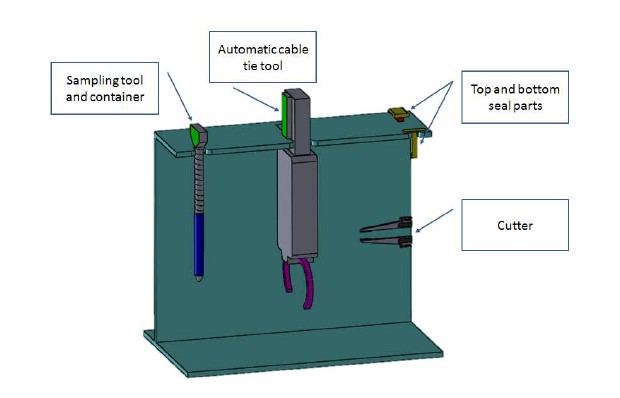
- Arm2 picks from the tool stand the cutting tool.
- Arm2 approaches for the cutting. Its cutting tool is designed so that, after the cutting operation, the portion of detached seal is grasped by the tool itself. A detailed drawing and explanations are reported in the Appendix relative to the tools.
- Both the upper and lower part of the seal are placed aside by the two arms.
- Arm2, which is holding the cutting tool, releases it in the tool-stand.
- Open the clamping ring
- Arm1 (assume it is the farther from the clamp, otherwise Arm1 and Arm2 switch) holds the lid and the clamping ring in the opposite side of the clamp, to prevent lid and ring from falling down or reach unexpected positions, once they are released.
- Arm2 approaches and grabs the clamp.
- Arm2 pulls the clamp, opening the ring.
- Securely place the clamping ring aside
- Arm2 pushes the ring from its side, in order to loosen it on Arm1’s side.
- Arm1 pulls up the ring together with the lid.
- Arm2 now grabs the ring and the lid from its side.
- Arm1 and Arm2 take away lid and ring, placing them aside in their cross-shaped support. [Appendices]
- Securely place the lid aside
- The lid results in being safely placed aside together with the ring in operation 1.c.4.
- Break the seal
Open the drum
Open the inner bag
-
- Cut the cable strap
- Arm1, with the help of the camera, can grasp the upper edge of the inner bag.
- Arm1 pulls up the inner bag a little, to create some room for the cable strap automatic tool.
- Arm2 grabs an automatic cable tie tool from the tool stand, whose details are mentioned in the relative appendix. The automatic tool encloses the inner bag just above the cable strap that is currently in position.
- Arm2 keeps in position the automatic cable tie tool, without tightening a new zip tie, however preventing the inner bag from opening too much.
- Via the 3D camera mounted on the ceiling we can detect the cable strap through its color. In fact, by reading on the challenge’s website, it is said to be red.
- Arm1 releases the upper edge of the inner bag to grab the cutting tool from the tool stand.
- Arm1 cuts the cable strap.
- Place the cable strap aside
- Arm1 while is cutting the cable strap, also grabs it (like done with the seal), so it can easily place it aside.
- Open the bag
- Still with Arm2 in position, Arm1 may reach the above edge of the inner bag and start stretching it in several directions in order to create a channel.
- Arm1 grabs the sampling tool from the tool stand. A specific appendix and pictures are provided alongside this document.
- With the help of the camera, Arm1 inserts the sampling tool in the bag.
- If needed, Arm1 can move in a spiral or move around the tool in order to enlarge the channel on the inner bag.
- Cut the cable strap
Sampling procedure
-
- Take a spoon
- Already done taking the sampling tool itself.
- Take a sample
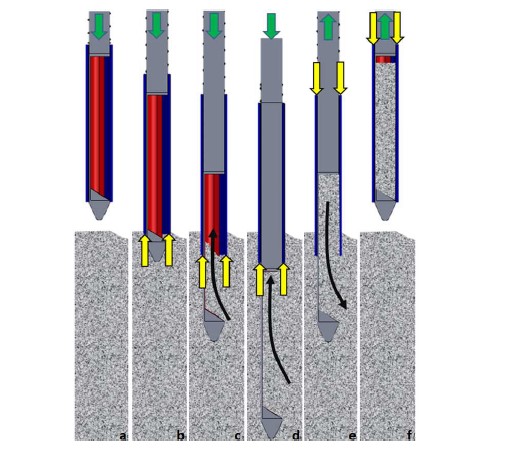
- Arm1 pushes the sampling tool deep in the powder, sensing the resistive force applied to the robot’s motion.
- Arm1 is pulled out from the powder. In the appendix relative to the sampling, those steps are illustrated in details.
- Put the sample in the container
- The sampling tool is thought as a sample container. However, an external container can be designed with an entrance suitable for the release of the powder (i.e. with a diameter that lets the inner part of the tool go in, but blocks the outer part. In this way the space allotted for the powder is uncovered and the sample falls down due to gravity, having the basement of its deposit-area inclined : if needed, a shaking motion can be done by the robot).
- Securely place the lid on the container
- Relying on the freedom given to participants in designing their own sampling tool and container, we thought out an all-in-one solution for our sampling tool (hence, being both sampler and container). The specific Appendix 5 describes structure and working principle of our sampling method.
- Place the sample away
- Arm1 places the sampling tool aside, in the tool stand.
- Take a spoon
Close the inner bag
-
- Grab and close the bag
- Arm2 now activates the automatic cable tie tool and it tightens a cable strap to lock the inner bag.
- Arm2 takes away the automatic tool and places it aside, in the tool stand.
- Attach a new cable strap to the inner bag
- Done in task 4.a.1.
- Push down the bag
- Still detecting the cable strap through the camera, Arm1 grabs the inner bag from that position.
- We push down the inner bag’s edge until we find the resistive force of the powder.
- Grab and close the bag
Close the drum and attach a new seal
-
- Separate lid and ring
- Arm1 grabs on one side of the clamping ring.
- Arm2 moves in the center of the lid and keeps it held down.
- Arm1 pulls up and de-couples the ring from the lid.
- Arm2 grabs the ring too.
- Arm1 and Arm2 place the ring in the support.
- Put the lid on the drum
- Arm1 and Arm2 grab the lid from its support.
- Arm1 and Arm2 place the lid in the drum by centering it with the help of the camera.
- Arm1 releases.
- Arm2 releases.
- Place the clamping ring on the drum
- Arm1 and Arm2 grab the ring from its support.
- Arm1 and Arm2 stretch the ring and engage it on the side of Arm2.
- Arm2 keeps the ring in position.
- Arm1releases.
- Arm2 slightly pushes the ring from its side, in order to loosen it on Arm1’s side.
- Arm1 slides all around the lid’s circumference (starting close to Arm1’s gripping point) to completely engage the ring on the drum.
- Arm1 grabs the clamp.
- Arm1 pulls the handle up a little and closes it.
- Separate lid and ring
ALTERNATIVE APPROACH:An alternative solution for the ring placement can be implemented if we are going to use a robot with enough strength. In fact, in our laboratory studies, with a clamping ring very similar to the one shown by the challenge videos, we figured out that if operation 5.c.5 is instead a strong push, the ring may pop directly in position. If it is so we could directly jump to step 5.c.7.
-
- Apply a new seal
- The seal, both upper and lower part, is picked up by the robotic arms from the tool stand. According to the positions of the manipulators, the arm closer to the sealing spot picks the lower part of the seal.
- The arm farther from the clamp (the one that cut the seal in 1.a.4) places the upper part of the seal in the proper spot, with the help of the camera.
- The other arm aligns the lower part of the seal with the upper one, that has been already inserted in its location.
- Apply a new seal
-
-
- Keeping in position the upper seal part, the robot holding the lower part can move it up and close the seal.
- Both arms release and safely go to their Home position.
-


